

Web scraping with Node and Cheerio
- Authors
- Name
- Hamza Rahman
- Published on
- -13 mins read


Introduction
Web scraping is a way to get data from websites, the data can be text, pictures, or any other downloadable files, etc. In this tutorial, we will scrape static websites that are not CSR i-e client-side rendered with JavaScript (React/ Angular sites).
In this tutorial will be using web scraping to get relevant jobs that are listed on Hacker News. We will be saving JavaScript, react, node, etc. jobs to Excel whenever our scraper code is executed.
Also, we will be making the code configurable to easily change filter parameters.

We will be web scraping with node.js, to do this we will get the site's HTML with Axios and then with the help of cheerio find the data we need to save. Further, we will see how to save the scraped data to a CSV file in node.js and handle pagination.
Project setup
Let's start by creating a new directory for our project, we can name the folder web-scraping-tutorial
$ mkdir web-scraping-tutorialgo into the new folder
$ cd web-scraping-tutorialNow assuming Node.js and npm is installed, we can initiate our project with:
$ npm init -yAnd install the dependencies:
$ npm i axios cheerio csv-write-stream dotenv momentCode
Requesting website HTML
We will use Axios to visit the website URL and get the HTML. Let's create a new file request.js and use this code to visit Hacker News
const requestURL = async () => {  const axios = require('axios')
  let options = {    method: 'get',    url: 'https://news.ycombinator.com/',  }
  try {    const response = await axios(options)    console.log(response.data)  } catch (error) {    console.error(error)  }}
requestURL()
Here we configure the options for Axios and set the URL we want to visit and set method to GET, passing this options object to Axios, we get the response object after the Axios promise is resolved.
Running request.js file with node
$ node request
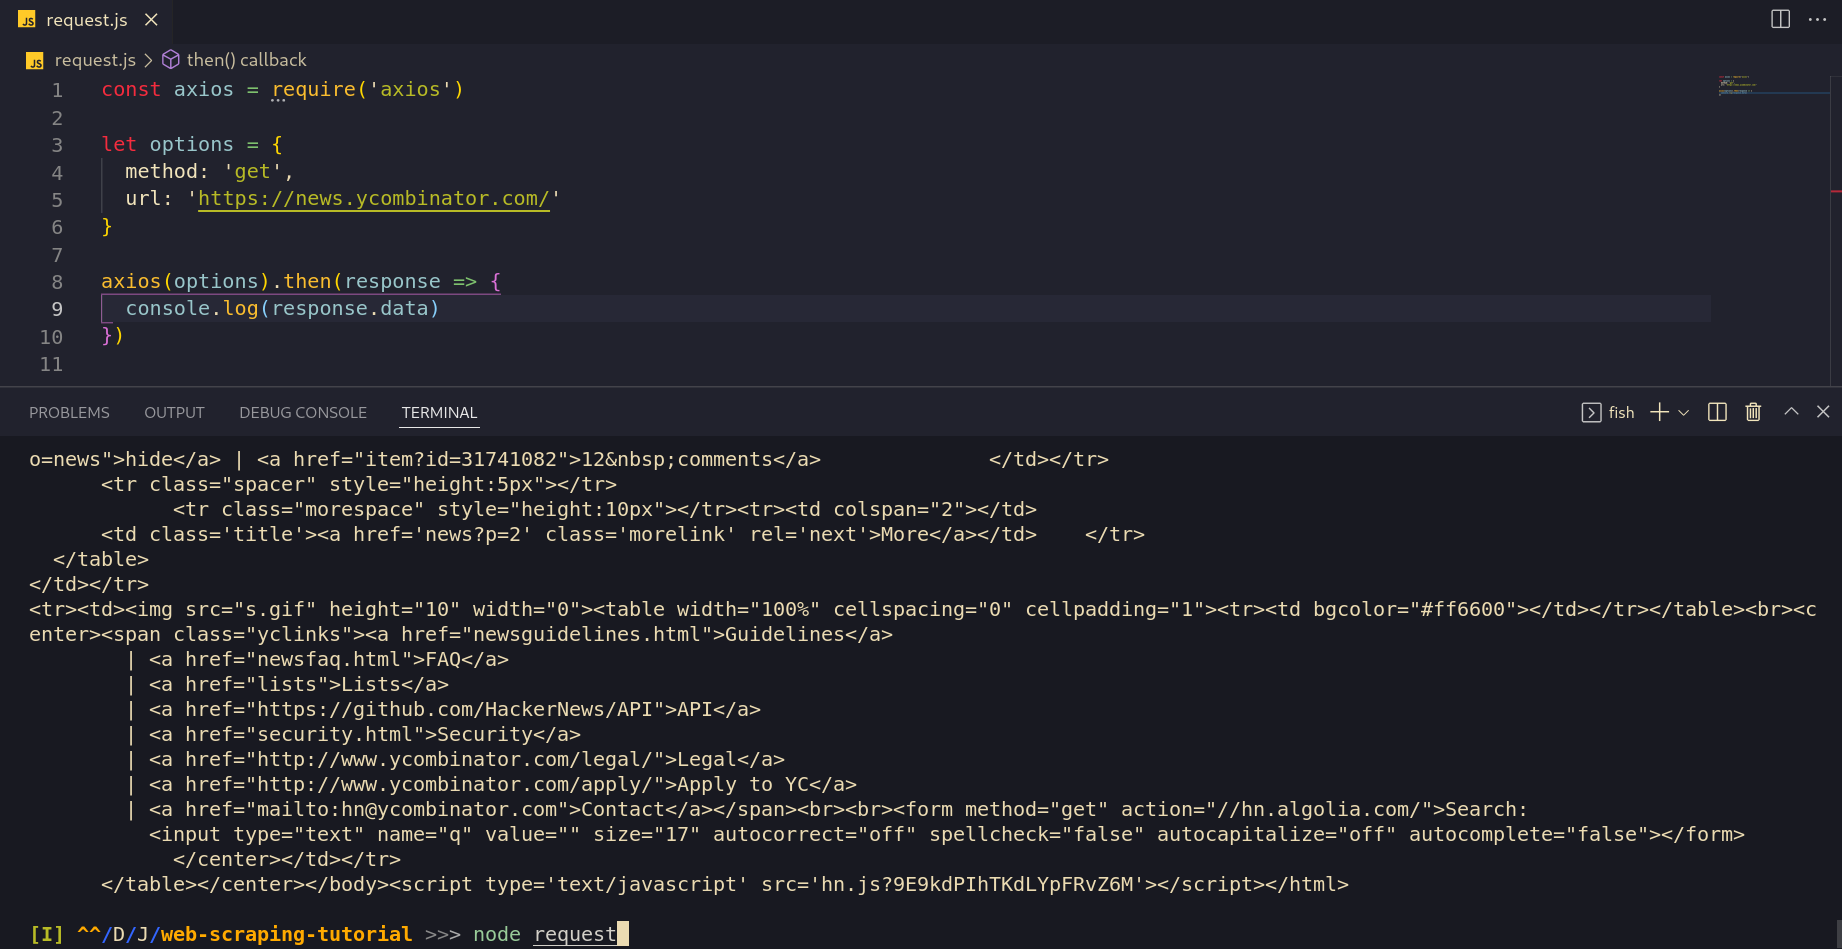
We see in response.data the site's HTML, now we can move to the next step and find the data we need in the HTML response.
Let's make the function more dynamic and export it, so we can pass it a URL and receive the site HTML back.
const axios = require('axios')
const requestURL = async URL => {  let options = {    method: 'get',    url: URL,  }
  try {    const response = await axios(options)    return response.data  } catch (error) {    console.error(error)  }}
module.exports = requestURL
env file
With an env file, we can pass configs to our handler function. Notice here FILTER_VALUES is an array but env file variables are string, so we will need to convert it to an array when using it.
URL="https://news.ycombinator.com/jobs"FILTER_VALUES=["javascript", "node", "react", "full stack", "full-stack"]MAX_DAYS_BACK=30URL variable is the site we will be visiting to scrape jobs.
FILTER_VALUES variable are the job types based on which we will be filtering data. e.g if we just keep 'javascript' here then only jobs that mention javascript will be saved.
MAX_DAYS_BACK variable will allow us to configure how old jobs we want to scrape.
Handler function
Let's make a handler.js file and make a function to control the app flow.
require('dotenv').config()const request = require('./request')
//env file variableslet { URL, FILTER_VALUES: filterValues, MAX_DAYS_BACK: maxDaysBack } = process.envfilterValues = JSON.parse(filterValues) //convert string to array
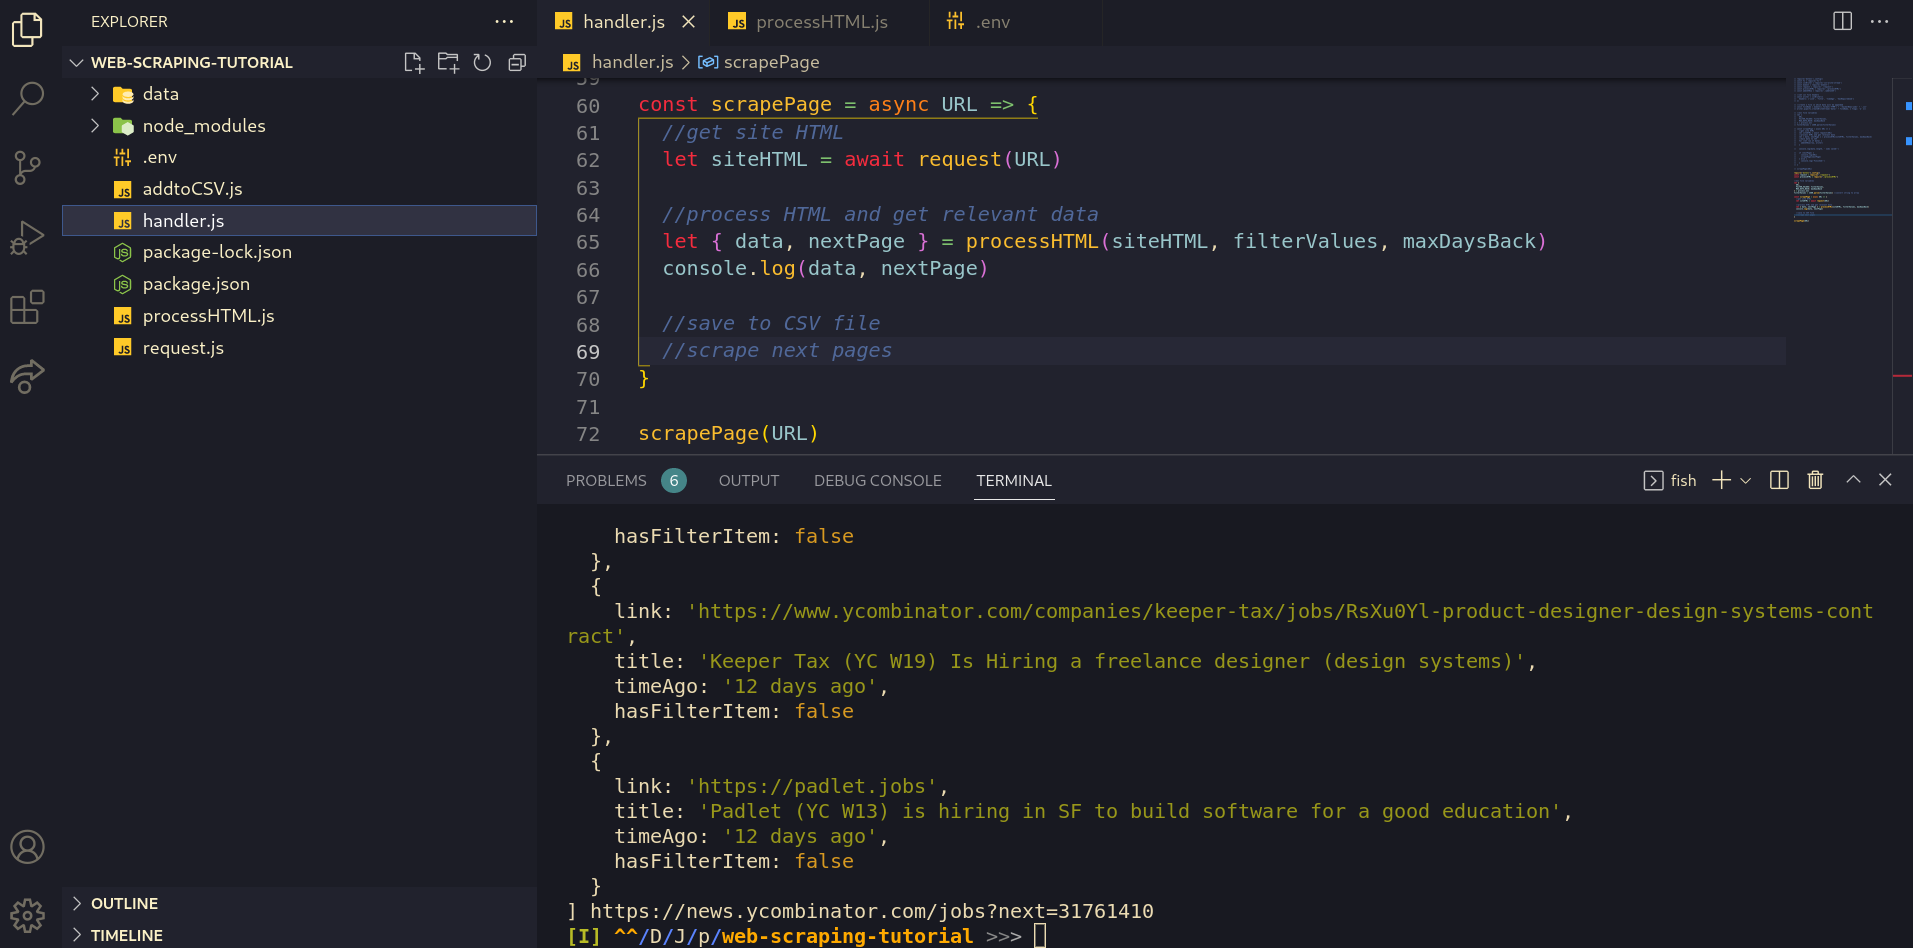
const scrapePage = async URL => { //get site HTML let siteHTML = await request(URL) console.log(siteHTML)
//process HTML and get relevant data //save to CSV file //scrape next pages}
scrapePage(URL)Now that we have accessed the site's HTML with Axios we can pass this HTML to cheerio.
Cheerio
Cheerio can parse the HTML and provide us with an API with which we can access and manipulate data as we require. Cheerio uses a subset of jQuery and therefore makes it easy for us to use CSS selectors to target DOM elements and access data.
Let's make a processHTML.js file where cheerio can run its magic.
const cheerio = require('cheerio')
const processHTML = HTML => {  const $ = cheerio.load(HTML)  let data = []  let nextPage = ''  //css selectors}
module.exports = processHTML
CSS selectors
From the HTML we require 4 things, the next page URL, the title of the job, the Link of the job, and the time job was posted. Let's go for the CSS selector of these, one by one:
Next Page URL
At the bottom of the page, you can find a more button that takes us to the next page. In our browser, if we right-click the more button and inspect the element, we see the site's HTML and the selected element focused.

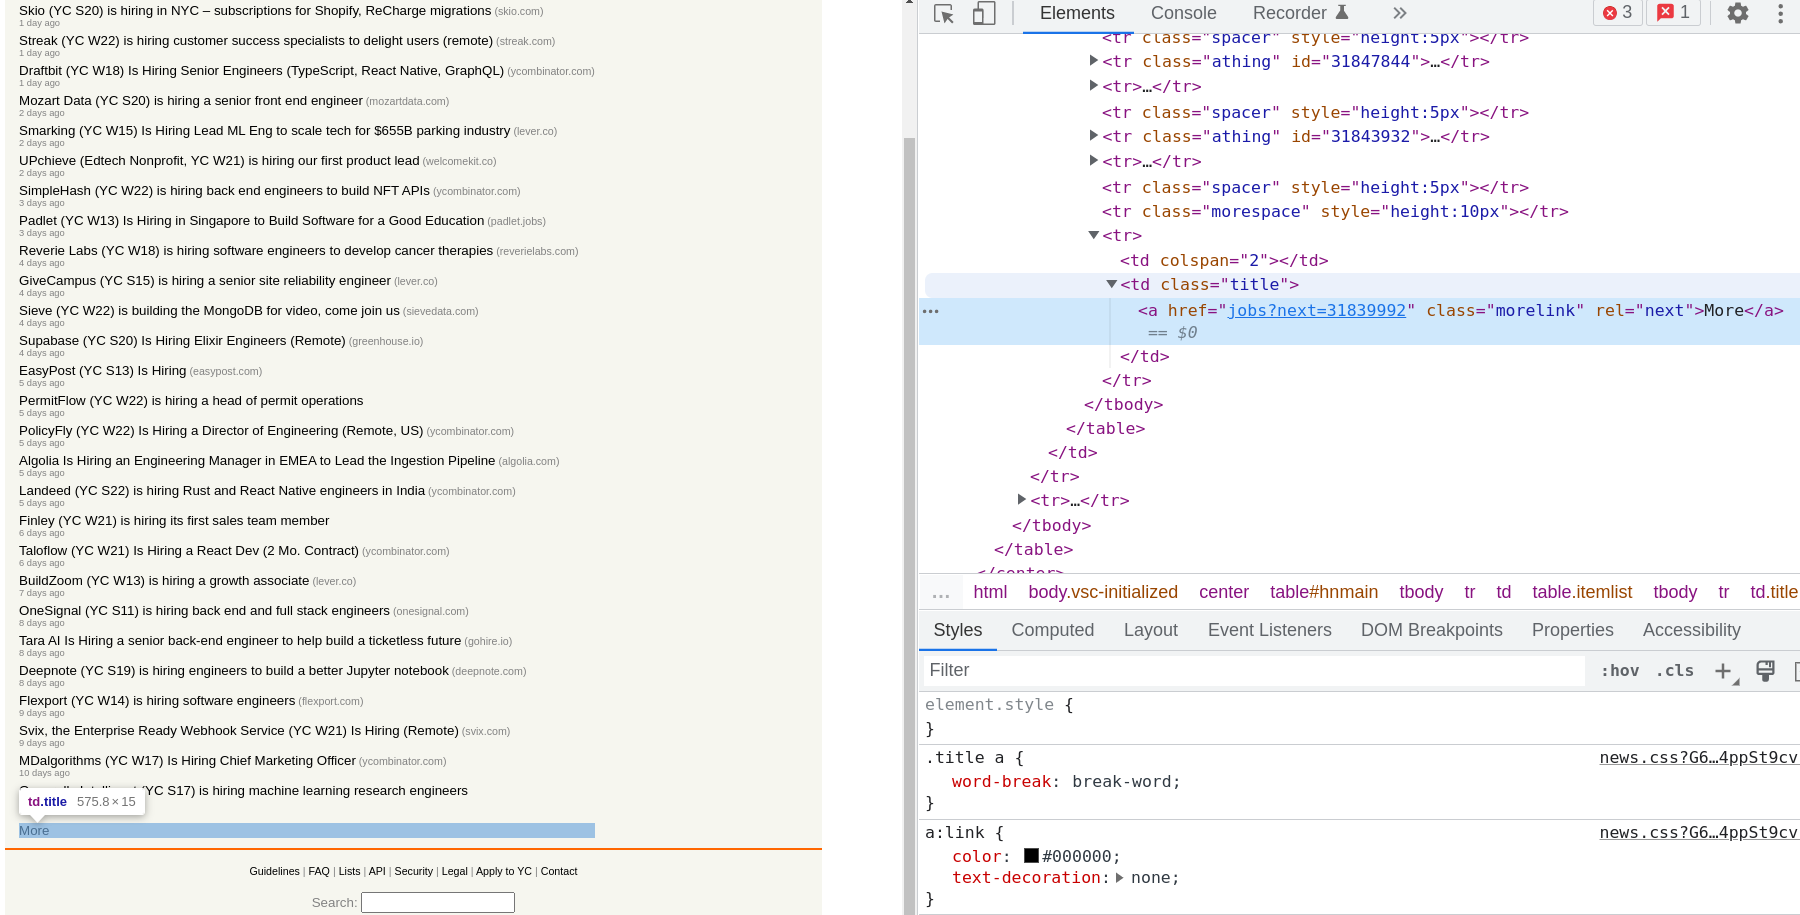
With the help of this inspect element tool, it's easy for us to see the element's CSS class. In this case, it's 'morelink'
In our code below the//css selectors line, let's use the nextPage variable to save the next page URL.
nextPage = 'https://news.ycombinator.com/' + $('.morelink').attr('href')This way with the help of cheerio we get the element with class morelink and access its attribute href. Now, combining this URL with the site's base URL gives us the complete URL for the next page.
Job Title
As the other 3 remaining fields are multiple, unlike nextPage, we will have to loop through the elements.
If we inspect the job title, we see something like this:

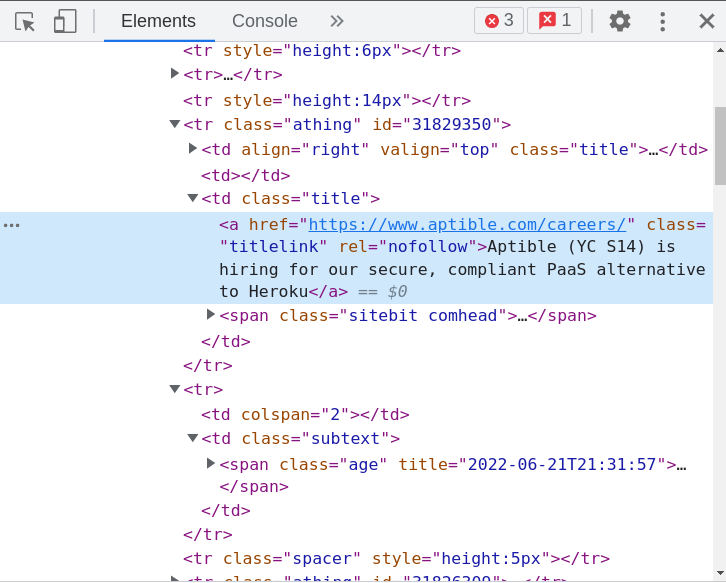
Instead of targeting the class titlelink directly, we will loop on a parent class of title athing and then find the element titlelink, doing so will ease the process of targeting the time posted selector as it's the next element to athing
In our code below the nextPage selector we can do this:
$('.athing').each((index, element) => { let title = $(element) .find('.titlelink') .text()})Here we are using .each, so we can access all the elements on the page with class athing, after doing so we can work on each element in the arrow function as we have access to the index and element.
Inside the arrow function, we can get the title of each element with the help of the .find() function, where we pass the CSS selector of an element we want to access. In our case, we pass .titlelink, so it can find it based on its class. And finally, .text() allows us to keep the text content of an element.
Job Link URL
Just like the title, link will use the same selector but instead of element text, we need the href.
let link = $(element) .find('.titlelink') .attr('href').attr() function allows us to select an elements attribute, In our case, we use it to get href.
Time Posted
Time of job posted is not a child element of athing, but it's the child element of the next sibling element.
let timeAgo = $(element) .next() .find('.age') .text()Here .next() allows us to move to the next sibling element in which we can find the element with class age and save its text content.
Filtering Data
To the processHTML functions let's pass the additional fields from the env file according to which we can filter out our data.
const processHTML = (HTML, filterValues, maxDaysBack) => { //...}Below the timeAgo selector, we will add this code to check whether the title includes any of the job titles we are interested in.
let titleLowerCase = title.toLowerCase()
let hasFilterItem = filterValues.some(item => titleLowerCase.includes(item))
The first step for filtering is to convert the title to lower case so we don't miss any jobs that may have upperCase words. In our enc file filterValues are also all lower case.
In the second step, we use the javascript .some method to find whether any of the filterValues are present in the job title. If one or more are present hasFilterItem becomes true otherwise false.
The other thing we want to keep in mind is to only keep freshly posted jobs, for that we have the MAX_DAYS_BACK variable in the env file. In our code below hasFilterItem let's add this code:
//time of last job posted on current pagelet timeAgoSimplified = timeAgo.includes('days') ? timeAgo.split(' ')[0] : 1timeAgoSimplified = parseInt(timeAgoSimplified)Here timeAgoSimplified takes the timeAgo string we extracted earlier and if it is in days we take only the number value from it and convert the string to an integer using the parseInt method. And in case the timeAgo isn't in days it would be in hours/minutes, so in that case, we save it as 1 day.
Saving Data
Now that we have the filters ready we can push each job that fulfills our requirement to the data array.
//check if time posted was less than maxDaysBack variableif (timeAgoSimplified < maxDaysBack) { data.push({ link, title, timeAgo, hasFilterItem, })} else { //if current page data is already older we don't move to the next page nextPage = null}With timeAgoSimplified we can check whether the job posted fulfills the maxDaysBack requirement and save only new jobs. In this code, I am saving all jobs to CSV whether they pass or fail the hasFilterItem check, but I will be adding a boolean column that will be true only if hasFilterItem is true.
If we wanted to keep only the jobs that have hasFilterItem true we can use:
//check if time posted was less than maxDaysBack AND filter values are also presentif (timeAgoSimplified < maxDaysBack && hasFilterItem) { //...}Outside the .each loop we return the data handler file:
return { data, nextPage }With this our complete processHTML.js code looks like this:
const cheerio = require('cheerio')
const processHTML = (HTML, filterValues, maxDaysBack) => {  const $ = cheerio.load(HTML)  let data = []  let nextPage = ''
  nextPage = 'https://news.ycombinator.com/' + $('.morelink').attr('href')
  //.each to loop over all class athing elements  $('.athing').each(async (index, element) => {    let title = $(element)      .find('.titlelink')      .text()    let link = $(element)      .find('a')      .attr('href')    let timeAgo = $(element)      .next()      .find('.age')      .text()
    let titleLowerCase = title.toLowerCase()    let hasFilterItem = filterValues.some(item => titleLowerCase.includes(item))
    //time of last job posted on current page    let timeAgoSimplified = timeAgo.includes('days') ? timeAgo.split(' ')[0] : 1    timeAgoSimplified = parseInt(timeAgoSimplified)
    //check if time posted was less than 30 days maxDaysBack    if (timeAgoSimplified < maxDaysBack) {      data.push({        link,        title,        timeAgo,        hasFilterItem,      })    } else {      nextPage = null    }  })
  return { data, nextPage }}
module.exports = processHTML
Now that our processHTML.js function is set up, from our handler.js file we can call it and pass the HTML and env variables required to like so:
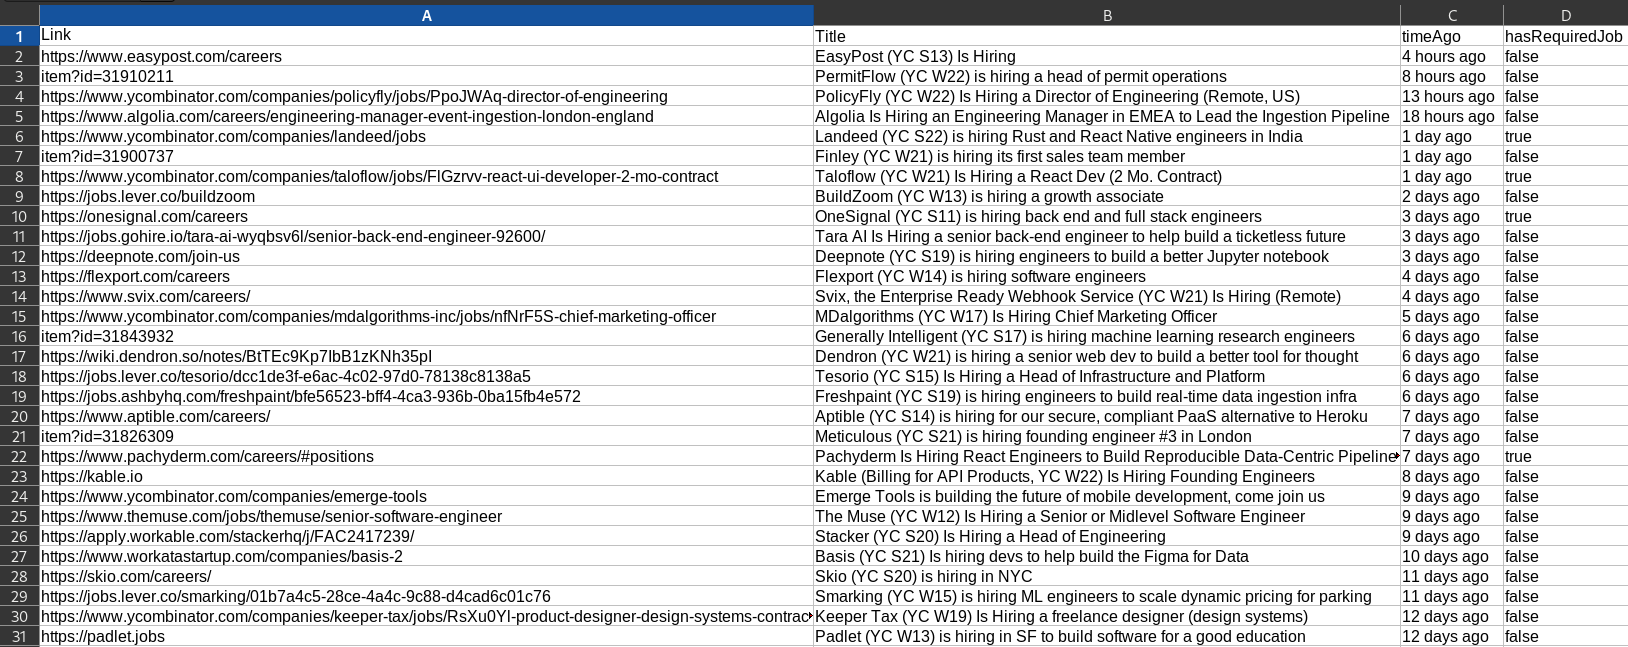
//process HTML and get relevant datalet { data, nextPage } = processHTML(siteHTML, filterValues, maxDaysBack)console.log(data, nextPage)Now running handler.js gives us an output like this, which is all the data we require from the page!

Saving data to CSV file
Now that we have the data accessed and well-formatted we can save it to a CSV file.
To do so we will be using the csv-write-stream library.
In handler.js let's import csv-write-stream, moment and fs and use them to create a CSV file.
//New code added below previous importsconst moment = require('moment')const fs = require('fs')const csvWriter = require('csv-write-stream')
//set csv file headersconst writer = csvWriter({  headers: ['Link', 'Title', 'timeAgo', 'hasRequiredJob'],})
//create a file in which data will be appendedconst fileName = moment().format('YY-MM-DD-HH:mm:ss') + '-hackerNews-jobs' + '.csv'writer.pipe(fs.createWriteStream(fileName, { flags: 'a' }))
After importing the new libraries we set the CSV file headers. We initialize the filename and keep it unique every time. If the filename is not unique running the app will append data and headers to the old file. To create a unique filename every time I am using moment to add the date and time to the filename.
We are using { flags: 'a' } in createWriteStream to append to the file created so writer will write new data at the bottom of all previous data(rows).
Now to write the incoming data to this file, add new code below the processHTML method call:
//process HTML and get relevant datalet { data, nextPage } = processHTML(siteHTML, filterValues, maxDaysBack)
// save to CSV filefor (let rowData of data) {  let { link, title, timeAgo, hasFilterItem } = rowData
  writer.write([link, title, timeAgo, hasFilterItem])}
Now running the handler.js file creates a CSV file and saves the data rows.
Handling site Pagination
Now that we have saved data for a single page successfully, saving data for the next pages is simple enough.
We need to visit nextPage from processHTML and repeat the same process for saving data.
// scrape next pages
if (nextPage) {  console.log(URL)  scrapePage(nextPage)} else {  console.log('Finished!')}
If processHTML method returns nextPage we visit it in a recursive loop till nextPage is null(In case data doesn't satisfy maxDaysBack check)
Our complete code for handler.js
require('dotenv').config()const request = require('./request')const processHTML = require('./processHTML')const moment = require('moment')const fs = require('fs')const csvWriter = require('csv-write-stream')
//set csv file headersconst writer = csvWriter({  headers: ['Link', 'Title', 'timeAgo', 'hasRequiredJob'],})
//create a file in which data will be appendedconst fileName = moment().format('YY-MM-DD-HH:mm:ss') + '-hackerNews-jobs' + '.csv'writer.pipe(fs.createWriteStream(fileName, { flags: 'a' }))
//env file variableslet { URL, FILTER_VALUES: filterValues, MAX_DAYS_BACK: maxDaysBack } = process.envfilterValues = JSON.parse(filterValues) //convert string to array
const scrapePage = async URL => {  //get site HTML  let siteHTML = await request(URL)
  //process HTML and get relevant data  let { data, nextPage } = processHTML(siteHTML, filterValues, maxDaysBack)
  // save to CSV file  for (let rowData of data) {    let { link, title, timeAgo, hasFilterItem } = rowData    writer.write([link, title, timeAgo, hasFilterItem])  }
  console.log(data.length, ' Jobs saved!')
  // scrape next pages  if (nextPage) {    console.log(URL)    scrapePage(nextPage)  } else {    console.log('Finished!')  }}
scrapePage(URL)
Conclusion
Web scraping is like a jigsaw puzzle but in reverse. You get the complete site's HTML(Complete puzzle) and then you have to somehow programmatically find only the data pieces you need(individual pieces 🧩). This process is made easier with cheerio which allows us to select the HTML element we need with easy-to-use Jquery API.
In a future article, we will learn how to scrape with puppeteer.js to handle JS-generated sites and also perform actions on websites.
Complete Code
You can find the complete code at this repo: